
A button maker machine kit turns printed designs into durable pin-back buttons for giveaways, team spirit, merch tables, and craft sales. Once the process is dialed in, it’s a fast way to produce consistent batches without outsourcing. Below is a practical breakdown of what a kit typically includes, how pressing works from artwork to finished pin, and how to avoid the usual hiccups that slow production.
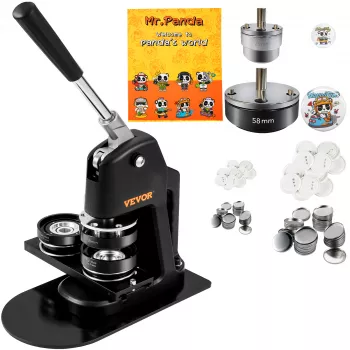
A button press is a hand-operated machine that crimps multiple layers into a single finished button. You’ll typically assemble a metal shell (front), your printed artwork, a clear protective film, and a back piece (often a pin-back) using a lever-driven press and matched dies.
Most kits are built around the press body and one button size. Some add starter consumables so you can practice immediately, but it’s normal to restock parts once you settle on your preferred materials.
| Component | Purpose | Notes to confirm before ordering |
|---|---|---|
| Press machine | Applies force to crimp and lock layers | Look for sturdy base and smooth lever travel |
| Die set | Forms and crimps to a specific diameter | Must match the exact button size being made |
| Metal shells | Front face that holds the artwork | Confirm material and size compatibility |
| Pin backs | Back piece with pin attachment | Choose pin-back, magnet, or keychain style as needed |
| Clear film | Protective layer over the print | Thickness affects wrinkles and crimp quality |
| Instructions | Setup + pressing sequence | Clear diagrams reduce trial-and-error |
Before buying extra supplies, decide what the buttons need to do and where they’ll be worn or displayed. That decision determines both size and back type—two things that must stay compatible with the die.
For kid-focused events, small components can be a hazard. Review the CPSC small parts regulations when planning giveaways and handling loose button components.
Most button-making frustration comes from setup issues, not the pressing itself. A stable machine and a standardized set of materials will make your results look “store-bought” faster.
If you’ll be producing larger runs, basic hand-tool safety habits help reduce strain and pinch risk. OSHA’s general guidance on hand and power tools is a helpful baseline for workstation setup and safe handling.
A clean button is the result of repeatable inputs: the same template, the same cut, the same pressing sequence. Once you standardize those steps, speed naturally follows.
Most kits include the press and at least some starter button parts, but artwork printing and cutting tools are usually separate. You’ll typically need a printer/ink and a reliable way to cut circles, and you must match every part (shells, backs, film) to the die size.
The most common causes are incorrect cut size, paper that’s too thick, off-center film or artwork, mixing incompatible parts, or using the wrong pressing sequence. Run a few test presses and standardize one paper type and one set of correctly sized parts.
Use adult supervision, keep loose small parts out of reach, and handle sharp pins carefully during assembly and distribution. For kid-heavy settings, consider alternative backs like magnets when appropriate and store finished items in closed containers.

Leave a comment